As a developer, have you ever found yourself in a WordPress code-tinkering nightmare where a simple change causes your site to break, and you can’t remember what you changed?
Or maybe you’ve wanted to collaborate with other developers but had no idea how to do it seamlessly. If any of this sounds familiar, let us introduce you to the lifesaver duo: WordPress and GitHub.
Integrating WordPress with GitHub is like putting a superhero cape on your development workflow. You get version control, effortless collaboration, and even some backup magic.
Over the past twelve-plus years, we at Mavlers have successfully delivered more than 5,000 WordPress projects for 3,000 clients globally. During these years, we have gathered expert insights on how integrations with platforms like GitHub make developers’ and website owners’ lives easier.
In today’s guide, we will help you gain clarity on the following:
- What makes the WordPress & GitHub integration so powerful
- Step-by-step guide to WordPress & GitHub integration
- GitHub best practices for WP or any coding project
Let’s dive in and explore why this integration is so awesome and how you can set it up without breaking a sweat.
The why: What makes this integration so powerful?
Before we get into the how-to guide, let’s understand why you’d even want to bother.
To begin with, Git allows you to make changes in the code while retaining the history of all the changes on your system. On the other hand, GitHub is the online repository for developers.
Here’s an insight into what GitHub can be used for:
- Save the modifications you make to your code
- Teamwork with other developers minus the drama. GitHub allows everyone to work on their own part of the project, and you can review changes before merging them. No more “Who overwrote my code?!” arguments
- Carry out version control like a pro. Ever made a change to your WordPress site and regretted it five minutes later? With GitHub, you can track every single change and even roll back to an earlier version if things go sideways. It’s like having a time machine for your code.
Also, WordPress development generally consists of two parts:
- Themes
- Plugins
We need to store code for both these WordPress development goals and keep it updated. This is where a solid WordPress-GitHub integration can help developers achieve both of these goals.
Moreover, GitHub can automate the deployment of changes from your repository to a web server through GitHub Actions, enhancing the speed and reliability of your development process.
Step-by-step guide to WordPress & GitHub integration
Follow these simple steps to connect GitHub with WordPress. If you have already completed any part, feel free to skip ahead.
1. Create a GitHub repository
1.1. Visit GitHub.

1.2. Click “Sign up” at the top right corner.

1.3. Enter your email and create a strong password.
1.4. After registering, confirm your email by entering the launch code sent to your inbox.
1.5. If prompted, click “Skip personalization” unless you want to add more details about yourself or your company.

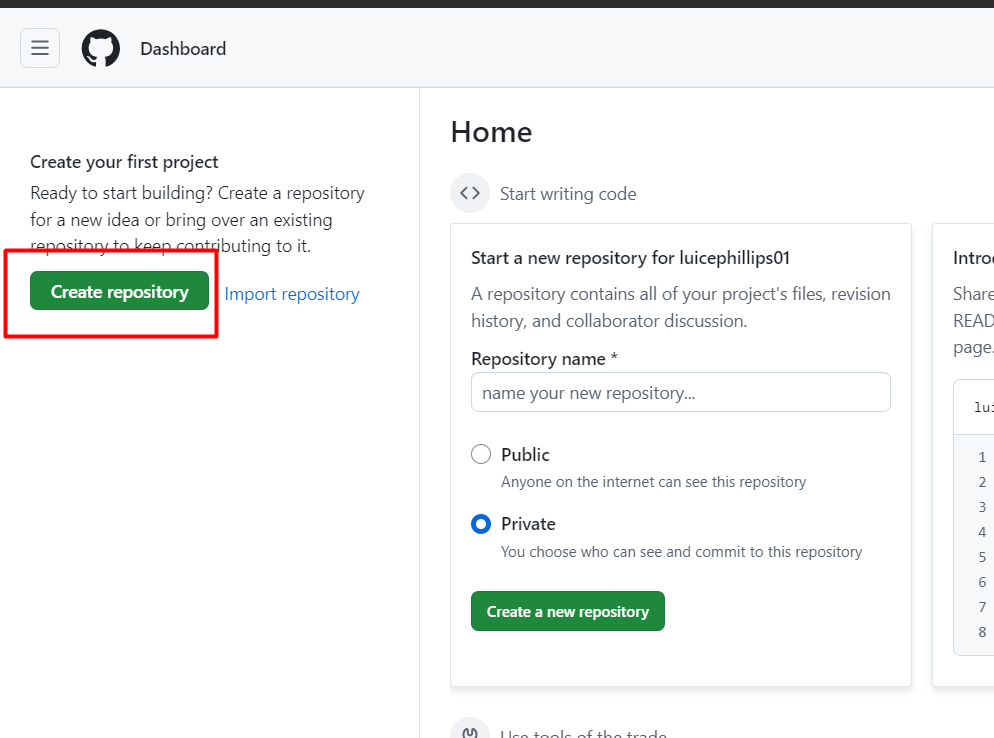
1.6. Now that your account is ready, click “Create repository” on the left sidebar.
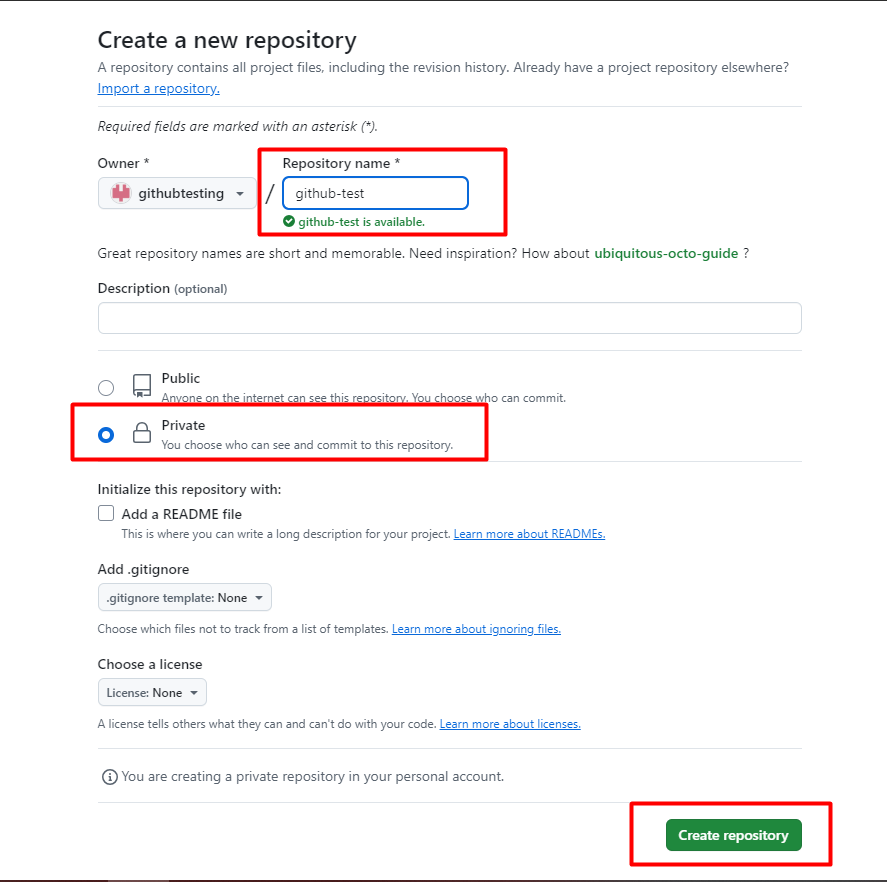
1.7. Name your repository and set it to “Private.” Leave other options as default, then click “Create repository.”
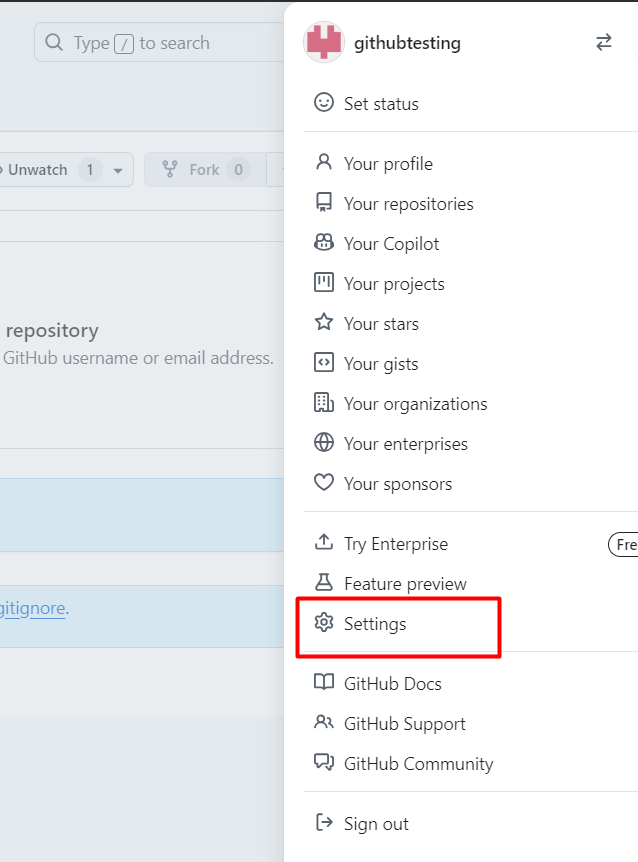
1.8. To communicate with GitHub from your local computer, set up an SSH key. Click your avatar at the top right, then go to “Settings.”
1.9. Navigate to “SSH and GPG keys” and click “New SSH key.”
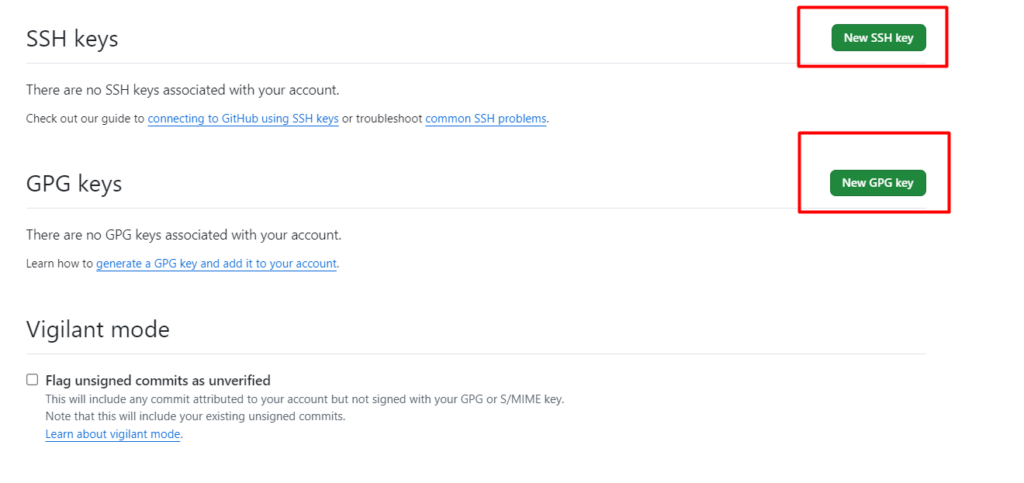
1.10. Add your public SSH key and name it (it’s helpful to use your computer name as the title).
1.11. Leave “Key type” as “Authentication key.” If you don’t have an SSH key, you may need to generate one. Refer to a guide on creating an SSH key if necessary.
2. Publish your project files to the repository
To keep things simple, it’s best to add only your theme files to the repository rather than your entire WordPress project. Here’s how:
2.1. In your console or terminal, change the working directory to your theme folder.
cd path/to/your/theme
2.2. Go to your repository page on GitHub and follow the instructions to set up a Git repository on your computer. Make sure to use SSH.
2.3. Now that your theme files are in the GitHub repository, keep updating and regularly pushing your changes. A good practice is to push your code daily.
3. Set up GitHub Actions for automation
GitHub Actions lets you automate workflows, such as auto-deploying code changes to your WordPress hosting. To configure this, create a .github/workflows folder in your project and add .yml files for your setup.
Here’s a sample file to automate deployments:
name: Deploy to staging
on:
  push:
    branches:
      - develop

jobs:
  build:
    runs-on: ubuntu-latest
    steps:
      - uses: actions/checkout@v4

      - name: Set up Node.js
        uses: actions/setup-node@v3
        with:
          node-version: ${{ env.NODE_VERSION }}
          cache: 'npm'

      - name: Install dependencies and build
        run: |
          yarn
          yarn build

      - name: Upload release artifact
        uses: actions/upload-artifact@v3
        with:
          name: release
          path: ./release.zip

  deploy:
    runs-on: ubuntu-latest
    needs: build
    environment: stage
    steps:
      - name: Download artifact
        uses: actions/download-artifact@v3
        with:
          name: release

      - name: Copy file via SCP
        uses: appleboy/scp-action@v0.1.4
        with:
          host: ${{ secrets.SSH_HOST }}
          username: ${{ secrets.SSH_USER }}
          password: ${{ secrets.SSH_PASS }}
          source: release.zip
          target: ${{ env.DEPLOY_TEMP_DIR }}
- Triggering deployment: This configuration deploys when code is pushed to the “develop” branch.
- Build process: Steps for setting up the environment, installing dependencies, and building the project.
- Deployment: Securely connect to your hosting to publish the files.
Set up Secrets: In your GitHub repository, go to “Settings” -> “Secrets and variables” -> “Actions” to securely store sensitive information like SSH keys.
You can even trigger deployments manually by visiting “Actions” in your GitHub repository and selecting “Run workflow” for a specific branch.
GitHub best practices for WP or any coding project
Check out the following universal best practices for any coding project that will help you code like a pro!
- Secure your repo: Always protect your sensitive information. Never push things like database credentials or API keys. Instead, use environment variables and keep that critical data out of your repo to avoid security risks.
- Commit often but thoughtfully: Make frequent commits to keep track of changes, but give each one a clear and meaningful message. “Fixed issue with login” is way better than “Updated code.” This helps everyone on your team (including future you) understand what’s been done.
- Stay organized: Use branches to keep things tidy. Create separate branches for new features and bug fixes, and use descriptive names like feature/user-login or bugfix/navbar. It’ll make managing your project a breeze and keep your main codebase stable.
The road ahead
Integrating WordPress with GitHub isn’t just for hardcore developers. It’s a game-changer for anyone who wants a more efficient, stress-free development experience. We now suggest reading ~ Simplify, Scale, Succeed: A Marketer’s Guide to GoHighLevel.


Naina Sandhir - Content Writer
A content writer at Mavlers, Naina pens quirky, inimitable, and damn relatable content after an in-depth and critical dissection of the topic in question. When not hiking across the Himalayas, she can be found buried in a book with spectacles dangling off her nose!
SEO Experts Swear by These 9 Screaming Frog Features—Here’s Why You Should Too!
Klaviyo AI for Email Marketing: Highlights from A First-hand Experience