What it takes to compete in the current retail is completely redefined by the advances in technology and data proliferation.
In response, retailers are on their toes, devising new ways to transform their business model.
Offering subscription plans to customers is one such common but tremendously successful model that merchants have been flocking to. The way the subscription market is growing, it is estimated that, by 2028, online subscriptions will be worth $2.3 trillion.
This data is a validation that consumers have already assimilated the novelty of subscriptions; they are looking ahead to the convenience of automated purchasing over manual reordering and regular product deliveries.
This also means that if your e-commerce store pivots to single-purchase acquisition, you are actively bleeding Customer Lifetime Value (LTV) to competitors who have already automated recurring payments in their Shopify stores.
That’s why no-code Shopify subscriptions have become such a powerful lever. They give merchants a more lucrative way to stabilize cash flow, boost LTV, and create recurring revenue than infrequent individual purchases.
To sell subscriptions through your Shopify store, the prerequisite is to set up Shopify recurring billing.
Shopify recurring billing lets your store:
- Securely tokenise a customer’s payment method
- Charge them on a predefined schedule—weekly, monthly, or annually.
Because of which, they don’t need to return to checkout for each transaction.
Recurring payments are why those Shopify subscription boxes keep showing up at your door.
What has changed recently is how easy this has become. Shopify’s mature subscription architecture now lets merchants set up sophisticated, no-code subscription flows in hours, not weeks.
Top guides often skip hands-on setup details, leaving e-commerce managers and store owners to guess at execution. This walkthrough fills that gap with click-by-click steps to enable Shopify recurring billing today.
Whether reducing churn or launching subscriptions, follow this no-code framework to master your Shopify recurring payments setup in hours.
What is recurring billing? (Simple definition + how it works in Shopify)
Recurring payments are often discussed as just another checkout feature, but operationally, they are a specific financial protocol.
At its simplest level, recurring billing is a secure, automated payment process. Here, you are establishing an agreement in which a customer authorizes you, the merchant, to withdraw funds at set intervals, without them ever needing to return to your storefront to approve each transaction.
For Shopify brands, this capability is the engine behind three distinct subscription business models:
- Replenishment: The “set and forget” model for consumables. Think of a brand like Who Gives A Crap, where toilet paper is shipped at a strict frequency so customers never run out.
- Curation: The discovery model. This is Ipsy sending a mystery bag of cosmetics every month. The product changes, but the billing event remains static.
- Access: Selling privilege rather than physical goods. This could be a digital membership that grants free shipping or exclusive access to limited drops, similar to how Amazon Prime operates.
How Shopify handles recurring payments
There is a common misconception that Shopify has a “toggle” you can flip to turn on subscriptions. That’s not quite right.
Shopify’s core architecture is built to be a secure vault, not a scheduler. Thanks to the Shopify Subscription API, merchants can provide a streamlined subscription experience to their customers.
It is through this API, merchants can:
- Define subscription plans tailored to their offerings.
- Specify recurring payment intervals —monthly or weekly, and set pricing accordingly.
- Offer these subscription plans to customers through their online stores.
But most importantly, through the built-in Shopify Subscription API, the platform handles the most critical part of the Shopify recurring billing: Tokenization.
- At the first step of tokenization, when a customer subscribes, the payment system immediately replaces their sensitive credit card details with a unique, random string of characters known as a token.
- The actual card data is encrypted and stored in a secure digital vault managed by the payment gateway, never touching your store’s database.
- For every subsequent billing cycle, your Shopify store sends this token back to the processor to authorize the new charge. The processor matches the token to the vaulted data to verify funds and complete the transaction.
- This allows recurring payments to process instantly while ensuring that customer financial data remains secure, which keeps you out of PCI compliance trouble.
However, Shopify itself is passive. It encrypts and stores customer payment tokens (via Shopify Payments or gateways such as Stripe) after initial checkout approval. It won’t auto-charge without explicit instruction, preventing unauthorized pulls.
This is where the Shopify subscription app ecosystem comes in. When you install a subscription app (whether it’s the native Shopify app or a third-party tool), you are essentially installing a “Scheduler.”
The app tracks the billing cycle. And using the Subscription Contracts API or Billing API, the app pokes Shopify via the API and says, “Use Token X to charge $50 right now.”
Step-by-step guide to setting up Shopify recurring payments using subscription apps
Now that your prerequisites are met, it is time to enable recurring payments on Shopify.
You can set up recurring billing on Shopify by installing a checkout-integrated subscription app and creating subscription plans that automatically charge customers on a fixed schedule.
You have two paths based on the following dichotomy:
- Use Shopify’s first-party Shopify Subscriptions app (free, native, limited)
- Use a third-party subscription app (Recharge, Appstle, Loop, Bold, Skio)
For this walkthrough, we’ll focus on native Shopify Subscriptions apps. Don’t worry, though. The workflow is nearly identical for premium apps like Appstle or Recharge, but the native app provides the cleanest “Zero Code” environment to learn the ropes.
Let’s walk through the Shopify recurring payments setup process the way Shopify actually expects merchants to do it.
Step 1: Installation & plan strategy
Before a customer can subscribe, you must determine the policy under which the product can be sold. In Shopify terms, this is called a “Selling Plan.”
In simpler terms, a Selling Plan is the master rule set that dictates frequency, discounts, and billing logic. By doing this, you’re creating a contract structure that the API will enforce automatically.
You might configure a Selling Plan called “Weekly Restock.” In this scenario, the rule dictates that the customer is billed every 7 days, and in exchange for this commitment, the system automatically applies a 15% discount to each recurring order.
Once saved, the API enforces this schedule and price adjustment universally across every product assigned to that plan.
The workflow:
- Install the App: Navigate to the Shopify App Store and install Shopify Subscriptions (free).
2. Create a Plan:
- Go to Apps > Subscriptions and click Create Plan.
- Plan Title: This is visible to customers (e.g., “Monthly Coffee Club”).
- Internal Description: Keep this clear for your team (e.g., “Standard 30-day auto-ship”).
3. Set the Frequency:
- Select your delivery interval (e.g., Weekly, Monthly, Yearly).
- Pro Tip: Offer multiple frequencies, e.g., “Deliver every 1 Month” AND “Every 2 Months”. It reduces churn from customers who find a single frequency too aggressive.
4. Define the Discount: Toggle “Offer Discount” and set your percentage (e.g., 10%). This is the primary incentive for users to hand over their tokenized payment details.
Subscription plans are reusable across products. Meaning that you don’t need to recreate billing rules for every SKU.
Step 2: Assigning products (The catalog integration)
Once the rule is created, the next step is to apply it to your inventory. You can do this in two ways: broadly via the App or surgically via the Product Page.
The workflow:
- Via the app: Inside your new Plan, click Add Products. You can select individual items or entire variants.
2. Via the product page (recommended for speed):
- Go to Products in your Shopify Admin.
- Scroll down to the new Purchase Options section that appears automatically after installing the app.
- Click Add Option and select your selling plan.
3. The “Subscription Only” decision. Here, you choose whether the product is Subscription-only or available as both a one-time and a subscription purchase.
- You will see a checkbox: “Only sell this product as a subscription.”
- Pro tip: Only check this for “Membership” products or exclusive boxes. For standard retail, always leave this unchecked to allow one-time purchases, or you risk alienating new customers who aren’t ready to take a subscription.
Step 3: The “No-Code” frontend setup to display subscription options on the storefront
To be able to subscribe to a recurring billing option, the customer must first see the choice on the product page. In the past, this was the most dangerous part of the setup. In the past, it required a developer to open your store’s backend code, specifically the product-template.liquid file, and manually paste snippet tags.
Now, we use App Embeds. They are self-contained elements that “float” or layer on top of your theme without altering your theme files.
The workflow:
- Go to Online Store > Themes and click Customize on your active theme.
- Navigate to a Product Page template.
- On the left sidebar, look for the Product Information section.
- Click Add Block and select Subscription Widget.
- Drag and drop to move the widget to where you want it, usually immediately above the “Add to Cart” button.
- Use the visual editor to customize the colors or text size to match your brand guidelines.
- Save.
Step 4: Add subscription management options for customers
A subscription program fails if customers cannot manage it themselves. If they have to email support to cancel, they will chargeback instead. You must enable the Customer Portal.
The workflow:
- Go to Settings > Checkout > Configurations > Customize.
- Click the App icon in the sidebar.
- Enable Management Blocks:
- Order Status Page: Add the “Subscription Management” button so they can see their plan immediately after buying.
- Customer Accounts: Add the “Subscription Portal” link to the main account dashboard.
- The “Thank You” Page: Add a subscription confirmation block to the post-purchase page to reassure the customer the recurrence is active.
Step 5: Review and update subscription policies
Legally, you are entering a recurring contract. Shopify automatically generates a Purchase Options Cancellation Policy when you install the app, but you must make it visible.
- Action: Go to Settings > Policies. Review the generated Subscription Policy.
- Next, ensure this policy is linked in your Checkout Footer. Customers technically cannot complete a recurring purchase without checking a box agreeing to these terms—this is a built-in safety feature to prevent “I didn’t know I was subscribing” disputes.
Where the payment gateway fits in
You might have noticed a glaring omission in the step-by-step guide above: Nowhere did we ask you to connect your payment gateway.
This is not an error. It is the defining feature of the modern Shopify recurring payments setup.
All payment methods for your Shopify store, including those used for recurring subscription charges, are managed centrally within the main Settings > Payments area of your Shopify admin.
Subscription apps use the payment gateway configured in your main Shopify settings to process both the initial order and all subsequent recurring payments.
The Takeaway: Do not waste time looking for a “Payment Settings” tab inside the Subscription App. If your main Shopify checkout works, your subscription billing works.
There is one major “Gotcha” that breaks this rule.
If you plan to offer subscriptions via PayPal, just enabling “PayPal Express” often doesn’t suffice.
PayPal requires a specific permission called “Reference Transactions” to allow a merchant to charge a customer without them being present. Most standard PayPal Business accounts have this feature turned off by default to prevent fraud. If you launch without checking this, your initial orders will go through, but every single renewal will fail.
Merchants must contact PayPal Customer Support and apply for approval. Once they approve it on their end, Shopify’s native connection will automatically handle the rest.
Choosing the right Shopify subscription app
Now that you understand the setup, you need to choose the “vehicle.” While the setup process is similar across the board, the capabilities vary wildly.
To help you decide on the right Shopify subscription app, we have analyzed the top contenders across three distinct business stages: The Starter, The Scaler, and The Enterprise.
The starter: the native Shopify subscriptions
Best For: New stores with simple catalogs and zero budget.
Cost: Free.
- This is Shopify’s first-party solution. It is built directly into the admin, making it the cleanest experience for those who want a “set it and forget it” button.
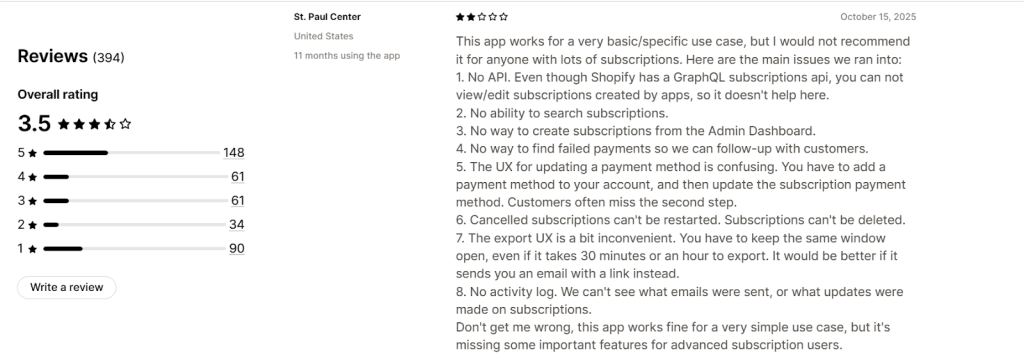
- The app integrates natively with Shopify’s checkout but currently holds a 3.5-star rating due to its lack of customization.
- It handles the transaction perfectly but lacks advanced tools like dunning management (retrying failed cards) or a complex customer portal.
- Use this if you are just testing the waters. If you expect more than 50 subscribers, you will likely outgrow its feature set within three months.
Strengths:
- Native Shopify Checkout integration
- No third-party transaction fees
- Simple setup inside Shopify admin
- Works seamlessly with Shopify Payments
Limitations:
- Limited customization of plans
- Basic customer portal
- No advanced retention, upsells, or analytics
The scaler: Appstle & Loop
These apps are designed for brands that need scale, flexibility, and deep integration.
1. Appstle Subscriptions
Best For: Small to mid-sized scaling brands that need enterprise features on a budget.
Cost: Starter $10/ month
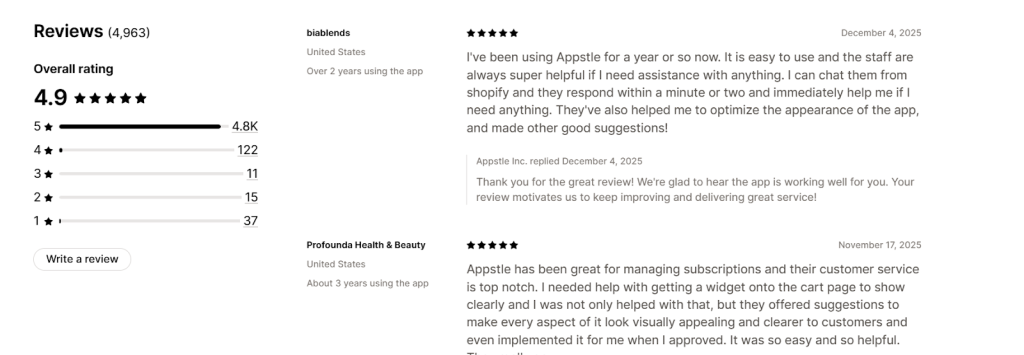
- Appstle has rapidly become a merchant favorite because it balances complexity with usability. It integrates so seamlessly that it feels like a native part of the Shopify admin.
- While most apps handle simple recurring orders, Appstle excels at mixed bundles. It allows customers to mix-and-match products. This logic usually requires custom coding, but here, it is a standard no-code feature that significantly boosts Average Order Value (AOV).
- It solves the churn problem with a polished Customer Portal. Subscribers can self-manage without emailing support. Plus, the built-in Dunning Management automatically retries failed cards to recover revenue in the background.
- Merchants appreciate Appstle’s pricing structure, which offers complex management and analytics with 0% transaction fees.
Strengths:
- Native Shopify Checkout support
- Build-a-box and bundling
- Advanced discounts and loyalty incentives
- Performance analytics and churn control
- Strong Shopify Markets compatibility
- Free plan available
Limitations:
- Less mature API ecosystem than Recharge
- May require plan upgrades as volume grows
The Verdict: If you want a user-friendly interface backed by a support team famous for quick responses, this is currently the strongest all-rounder in the ecosystem.
2. Loop Subscriptions
Best For: Brands that view subscriptions as a “Relationship” rather than just a transaction.
Cost: Starter $99/ month
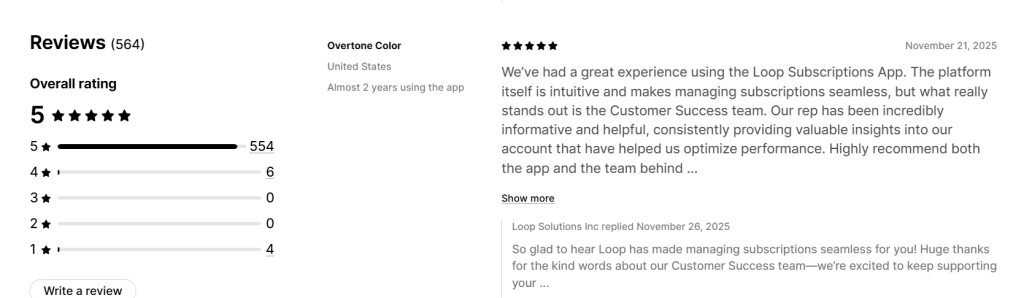
- Loop goes big on gamifying the subscriber experience to prevent cancellations.
- The key differentiator is the “Cancellation Flow.” Instead of just letting a customer leave, it asks why they are canceling and automatically offers personalized alternatives. (e.g., “Don’t cancel, just skip this month for a free gift”).
Limitations:
- Pricing starts at $99/month, meaning you need a solid base of subscribers to justify the cost.
- While powerful, some of the most advanced automation features are locked behind the “Pro” tier
The Verdict: Choose Loop if your primary metric is reducing churn.
The enterprise: Recharge subscription apps
Best For: High-volume brands needing complex billing rules, multiple SKUs, or custom API integrations.
Cost: Starts at $99/month (Standard) to Custom Pricing.
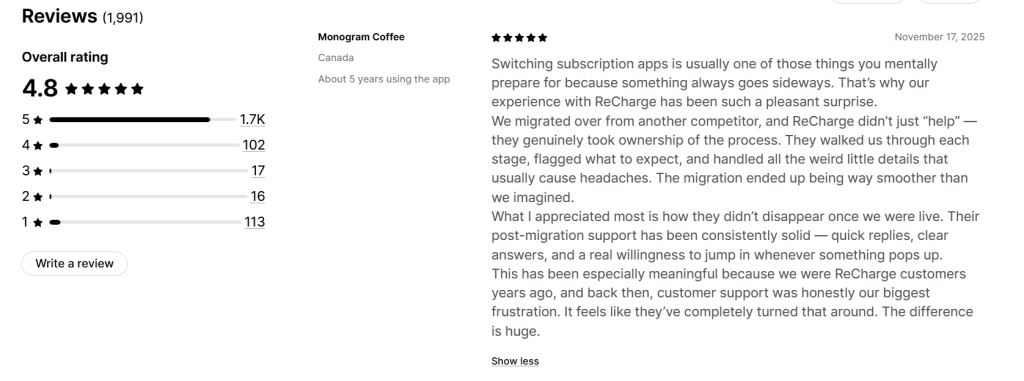
Recharge is the veteran of the space. It supports complex, external payment gateways and offers deep API access that newer apps cannot match.
But it comes with “legacy weight.” It can be more expensive and complex to configure than newer, nimble competitors. Unless you need to integrate with a custom ERP system, complex needs, and the resources to utilize its full potential, Recharge is likely overkill for a no-code setup.
Limitations:
- The “Standard” plan often starts at $99/month plus transaction fees (typically 1.25% + 19¢). For a store just starting out, this is a heavy operational tax.
- Recent merchant reviews highlight a frustration with support tiers. Smaller merchants often report getting stuck in loops with AI chatbots or generic help docs, while “white-glove” human support is reserved for the higher-paying Pro plans.
- Because it is a massive, older platform, the interface can feel “clunky” compared to the sleek, modern dashboards of Appstle or Loop.
The Verdict: Do not use Recharge just because it is famous. Only use it if your business logic is so complex that the “No-Code” apps (Appstle/Loop) technically cannot support it.
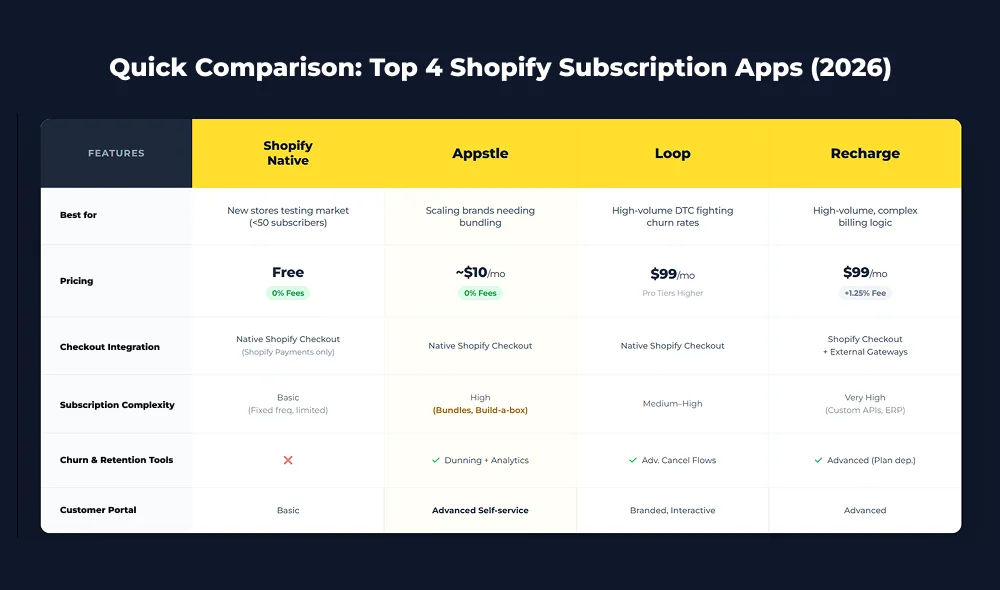
Quick Comparison: Top 4 Shopify Subscription Apps (2026)
Frequently asked questions about Shopify recurring billing
Can I set up recurring payments on Shopify without a developer?
Yes, 100%. If you can drag and drop an image in the Shopify Theme Editor, you can set this up. The “custom code” era ended when Shopify launched Online Store 2.0. You are required to just set up a Shopify subscription app (like Appstle or the native Shopify one).
What are recurring charges on Shopify?
Recurring charges are automatic payments collected from a customer after they place an initial subscription order. Once the first checkout is completed, future charges run on a fixed schedule using the payment method the customer approved—without asking them again.
Is Shopify recurring billing automatic, or do I need to send invoices?
It is fully automatic. Unlike recurring invoices, Shopify recurring billing uses tokenization. Once a customer subscribes, their card is vaulted, and the system automatically pulls the funds on the due date. You don’t lift a finger.
Why is my Shopify recurring billing not working with PayPal?
Because standard PayPal protects users from unexpected charges. You need to contact PayPal support and explicitly ask them to enable “Reference Transactions” for your merchant account. Until this is active, renewal orders will fail.
How do I turn off or cancel a customer’s recurring billing on Shopify?
Do not just delete the order in Shopify Admin. You must cancel the Subscription Contract.
- Method A (Merchant): Go to the subscription app, find the customer, and click “Cancel Subscription.”
- Method B (Customer): If you enabled the Customer Portal, the customer can log in to their account and click “Cancel” themselves.
Can I sell the same product as both a one-time buy AND a subscription?
Absolutely. When you set up your Selling Plan, just make sure you uncheck the box that says “Only sell this product as a subscription.” This enables the widget on your product page that allows customers to select either “One-time purchase” or “Subscribe & Save.”
Does Shopify take a percentage of my recurring revenue?
Shopify doesn’t charge a specific “Subscription Tax,” but the standard processing fees still apply. However, keep an eye on your third-party app. While the native Shopify app is free, premium apps like Recharge or Loop often charge their own transaction fee (around 1%) on top of what you pay for credit card processing.
More Resources:
Advanced Shopify Performance Optimizations: How to Improve Speed, Core Web Vitals, and UX?
How to show Shopify products directly in WordPress (without breaking a sweat or a script!)
AI for Shopify stores: Practical ways to automate, personalize, and grow your business
Offline Support, Push Notifications & Better UX— Courtesy of Shopify PWAs