It’s no news to you that Webflow performance optimization is a necessity in this day and age of “instant everything”.
A slow-loading page is more than just frustrating. It comes with a lifetime guarantee of killing conversions, repelling visitors, and sabotaging your search visibility. Visitors who have no obligation to tolerate delays bounce, take their business to competitors if your site lags.
Recognizing this, Google introduced Core Web Vitals. A set of real-world, user-centered benchmarks Google uses to determine whether your pages offer a good experience.
Doing well on these metrics means your Webflow site loads and responds quickly. By serving a better page experience, such sites enable users to get more done in less time and engage deeply across all devices. Needless to mention, encourages transactions and strengthens your brand reputation.
And, Webflow performance optimization isn’t as complicated as you might think. Yet, it’s far from just a design problem. It does get a bit technical, but that’s exactly what’s needed to create sites that are both attractive and high-performing.
Let’s take a closer look at how to make that happen.
Why Webflow speed optimization matters—even if your site “feels fine”
You might wonder if Webflow speed optimization is really necessary when your site already seems to perform well. Yes— in our experience.
Faster sites not only improve user experience but also directly impact your search rankings and conversion rates. There is enough data that confirms that even small improvements in load times can lead to significant business benefits:
- Sites that load in 1 second convert 3× as much as those that take 5 seconds (Portent).
- An increase of load time from 2 to 3 seconds in load time increases bounce rates by 50% (NitroPack).
- Every 1-second improvement in load speed can boost conversions by up to 17% (Bidnamic).
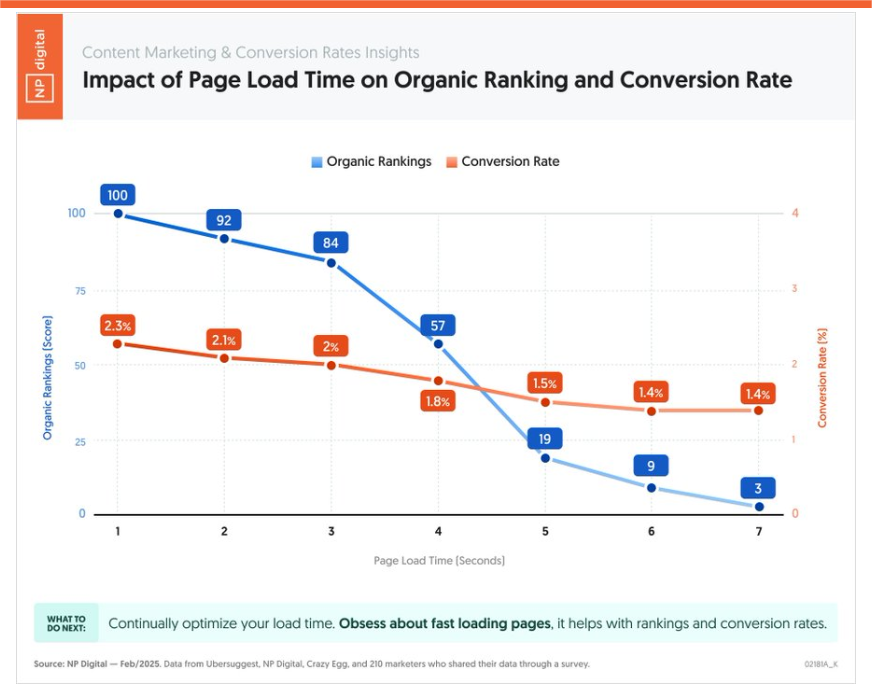
- Neil Patel’s analysis shows a direct correlation between faster load times, higher organic rankings, and stronger conversion rates.
In a nutshell—
Smooth, snappy websites remove barriers. The resulting page experience makes it easier for users to take key actions, such as signing up, buying, or exploring further.
For sites, where design and performance go hand in hand, Webflow speed optimization is essential to keep visitors engaged and convert them into loyal customers.
Core Web Vitals: The Webflow performance lampposts you can’t miss
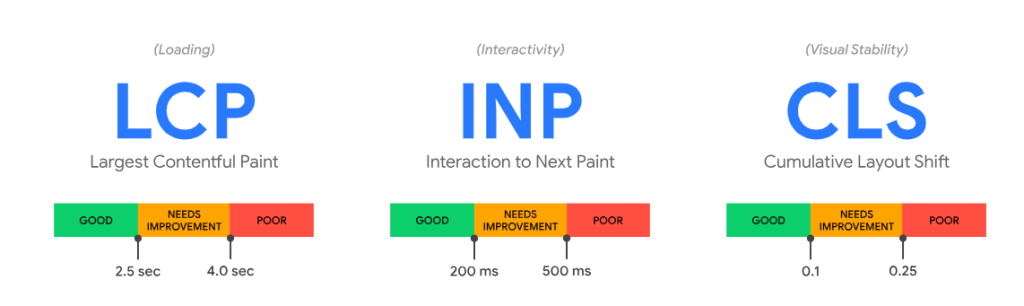
Core Web Vitals are crucial in optimizing Webflow websites for speed and user experience. Defined by Google, these metrics focus on real-world user experience by measuring loading, interactivity, and visual stability.
Thanks to them, site owners can measure and improve the quality of experience they are delivering to their users.
PageSpeed Insights and Webflow’s built-in performance panel are the tools to make it easy to see where you stand in terms of your site’s user experience.
But here’s the breakdown of what Webflow Core Web Vitals mean:
1. Largest Contentful Paint (LCP): Loading performance
LCP tracks how quickly the main content, like a hero image or heading, on your page becomes visible.
- For a good UX: LCP should be under 2.5 seconds.
- Faster LCP directly correlates with higher user satisfaction and better rankings. Slow LCP is the #1 issue we fix on Webflow sites.
2. Interaction to Next Paint (INP): Page responsiveness
INP replaced the older metric, First Input Delay (FID) in 2024, and it measures how responsive your site is to any interaction—clicks, taps, keystrokes, menu toggles, form inputs.
- Good score: 200 milliseconds or less.
- INP represents the full interaction lifecycle, not just the initial delay. If visitors tap and the page hesitates, they leave.
3. Cumulative Layout Shift (CLS): Visual stability
CLS measures how much your layout jumps around as elements load—like when a button shifts and you accidentally tap the wrong thing.
- Good score: 0.1 or less
Even small layout shifts destroy trust and conversions. In one case study from Yahoo! Japan, reducing layout shifts by just 0.2 seconds increased pages per session by 15.1%.
How to optimize the speed and performance of your Webflow website
Most Webflow speed and performance issues don’t come from big, dramatic mistakes. They bud from the “invisible heavy stuff” no one notices — until your site starts feeling sticky, slow, or strangely unresponsive.
Here’s the version of optimization that real Webflow teams rely on.
1. Optimize images — they hamper your speed more than anything else
If you’ve ever wondered why a clean Webflow build slows down after some time? In our experience, there’s a 90% chance an image is the culprit. Creators upload stunning visuals… and forget to shrink them.
Your practical rule:
If an image loads above the fold, it needs to be tiny, sharp, and optimized. If it’s below the fold, it shouldn’t load until the user scrolls.
Use these quick wins:
- Compress every JPG/PNG before upload.
- Convert everything possible to WebP. Webflow now converts images to WebP automatically—use it. You get sharper visuals at a fraction of the file size.
- And if your images live inside the Webflow CMS? Use a bulk optimizer (like Optily or any equivalent) to compress and reupload them. Webflow won’t optimize those on its own.
- Keep SVGs for icons, logos, and UI. Pro tip: make all SVGs uniform in size and run them through an SVG compressor for clean, fast-loading code.
- Use lazy loading so images load only when visitors scroll to them; Webflow sets this up by default now.
- Never upload a 4000px hero photo for a 1400px container.
- Background images cannot be lazy loaded or properly optimized, so they drag your load time no matter what. Use a regular <img> with object-fit instead. Looks the same, loads faster.
Reason this matters:
Fix images and your LCP, CLS, and improve Webflow site speed in one shot. It’s the single biggest “fast win” in Webflow.
2. Fix the LCP
If you have high LCP, you have another problem on hands that needs immediate action plan:
What improves LCP:
- A fast host (Webflow already checks this box).
- A lightweight hero image or background video.
- Preloading the hero asset so browsers prioritize them when loading.
- Avoiding any render-blocking CSS or JavaScript in the top section.
3. Improve INP
INP isn’t about loading. It’s about how responsive your site feels when users click a button or open a dropdown.
Where creators unknowingly break INP:
- Heavy animations
- Too many event listeners
- One giant JavaScript task doing 50 things
- Bloated DOM structures from copy–paste building
How to better INP:
- Break long scripts into tiny chunks to keep your site responsive.
- Only load the JS that’s needed on that page.
- Move intensive logic into Web Workers. This lets you handle heavy tasks in the background without freezing the page.
- Keep layouts lean so the browser can react instantly.
- Optimize event handlers to minimize delays in response.
4. Stabilize the layout (CLS)
A few things make a site feel cheaper than text or images, suddenly shifting as elements load.
Prevent layout shifts by:
- Setting fixed width/height for images and embeds.
- Reserving space for dynamic elements (banners, ads, popups).
- Using CSS transform animations instead of layouts that trigger reflows.
- Avoid third-party scripts that can insert elements unpredictably.
- Preloading fonts so text doesn’t do the “jump scare” on load.
- Prefer system fonts when possible. Fonts like Arial, Helvetica, and system-ui load instantly because they don’t require downloads.
- Use custom fonts only when absolutely necessary. Keep your typography simple, 1-3 fonts.
5. Treat third-party scripts with extreme caution
A little is fine. Too much slows everything down. Chat widgets, heatmaps, analytics tools, tracking pixels, animation libraries — they all load before your content does.
Smarter way to load scripts:
- Delay them using Google Tag Manager (up to 6 seconds). You can set tags to load only when needed, such as after initial page load or on specific pages.
- Load scripts only on pages that actually need them.
- Avoid mobile scripts for heavy interactions.
- Look for script-free alternatives before installing anything new.
If you clean up even 20% of your scripts, your site often feels instantly lighter.
6. Lean on hosting + CDN
Good design can’t overcome slow infrastructure. Webflow’s hosting is already optimized for global delivery, but performance jumps further when:
- Caching is configured properly.
- Assets are distributed via a global CDN.
- Images are served in responsive sizes.
- TLS/SSL and DDoS protections are active.
- Traffic spikes are managed automatically.
7. Test (before and after)
Every change you make affects Webflow performance. Sometimes dramatically. So, none of these optimization practices matter unless you test your changes.
One test is never enough.
Run 5–10 tests per change because results vary based on hardware, network, browser extensions, and even what else your system is doing in the background.
Your testing toolkit:
- PageSpeed Insights
- Web.dev
- GTmetrix
- Pingdom
Make a change → test.
Undo a change → test.
Add a new section → test.
This is how professional Webflow agencies like Mavlers keep speed high, visitors engaged, and search rank visible even as sites scale.
The road ahead
Speed is a ranking factor. But it’s also just the starting line. Once your Webflow site loads and responds smoothly and nails its Core Web Vitals, the real job begins: turning that technical foundation into visibility, engagement, and growth.
Webflow performance optimization gets people through the door. Content, structure, and smart SEO keep them there.
That said, implementing all these Webflow performance best practices, especially if you’re running a heavyweight Webflow website, can get overly technic-y. In which case, there is no shame in taking the project to the professionals.
If you want to go deeper into strengthening your Webflow presence, here are a few reads our team recommends: