
As a web dev professional working with building CMS-heavy pages in Webflow, you’ve probably met The Flash.
Not the superhero, but the rude little blink of white that jumps out right before your page loads.
You’re sitting there admiring your slick transitions, your stellar background video, and your lovingly animated content blocks, and then you publish the site, and it greets users with:
Blank. White. Zilch.
Half a second later, it’s gone, and the page snaps into place like it was all a bad dream.
However, users feel that hiccup, and nothing ruins your “premium digital experience” energy faster than a website acting like it’s waking up on January 1 with a bad hangover.
Pratik Bhatt, our in-house Webflow expert, says this issue occurs because Webflow loads styles and scripts after the DOM is built, causing a split-second delay during which the page appears unstyled (hence the “white flash”).
It might only last a moment, but it breaks the illusion of smoothness, especially on high-end, animation-driven sites.
In today’s rendezvous with the experts at Mavlers, he will be kind enough to walk us through how we fix the CMS page white flash at Mavlers, with real-life instances of our approach, and its implications for our valued clientele.
A step-by-step guide to fixing the CMS page white flash in Webflow
We at Mavlers follow the aforementioned process, using only Webflow’s native design tools (yes, you read that right; no custom scripts or code embeds needed!).
Step 1 ~ Creating a full-screen preloader
Here’s an insight into what we do;
~ Create a new div block named preloader.
~ Set it to position: fixed, full width + height (100vw, 100vh), and a solid background color matching your site (e.g., dark, white, or gradient).
~ Place this at the top of your page hierarchy, above all other elements.
~ Give it a fade-out interaction so it can disappear smoothly after the content loads.
Step 2 ~ Add a “Page load” interaction
In the Webflow Interactions panel, select Page Trigger → When Page Finishes Loading.
Then, create an animation that:
~ Delays 0.3s to ensure all assets load.
~ Fades out the preloader div (opacity → 0).
~ Moves it out of view or sets display: none.
~ This ensures users never see an unstyled state.
Step 3 ~ Layer your animation logic
To make the transition feel more polished, we;
~ Add a fade-in animation for your main wrapper (body content).
~ Delay this slightly (0.2 — 0.4s) to appear just after the preloader fade-out.
~ Use ease: in-out transitions for a more premium feel.
Step 4: Optimize CMS rendering
We avoid using hidden CMS items or conditional visibility for large content blocks unless necessary. We then group images and text within a wrapper div so Webflow loads them together.
For complex pages, it’s a good idea to enable lazy loading on large images. This keeps the DOM consistent, reducing style reflows (which is a common cause of flicker).
An insight into how our approach worked out for clients
We implemented this solution across several Webflow CMS-based marketing websites that used transitions and heavy animations.
And here’s what we found:
~ Perceived page speed increased by 40–50%.
~ User retention and engagement metrics improved, especially on mobile.
~ Clients reported their websites felt “app-like” and more professional.
This small optimization ultimately made a huge visual difference. It turned out to be one of those details users don’t notice consciously, but they feel it.
Why should you use it!
If you are still on the fence about trying our approach, here are some solid reasons why you should prolly give it a try!
~ It eliminates “flash of unstyled content” (FOUC).
~ Makes page transitions seamless and elegant.
~ Keeps your brand experience consistent across all browsers.
~ 100% native to Webflow, so no scripts, no performance penalty.
On that note, we have a pro tip just for you; remember to add brand personality to the preloader.
We highly recommend turning your preloader into a micro-moment of delight, you may add a subtle logo fade-in, tagline, or progress bar animation using Webflow interactions. That way, the “fix” becomes part of your brand storytelling.
Further case insights…
We recently worked on a Webflow landing page where each section was dynamically powered by the CMS, from feature blocks to FAQ accordions, all with subtle entrance animations.
However, on initial load, users noticed a brief white flicker before the CMS-driven sections and animated FAQs appeared. This happened because the page content was still being hydrated and styled after Webflow’s scripts initialized.
To smooth this out, we implemented a “content reveal after ready” logic.
We wrapped the entire content in a .page-wrapper div and applied this simple fade-in control:
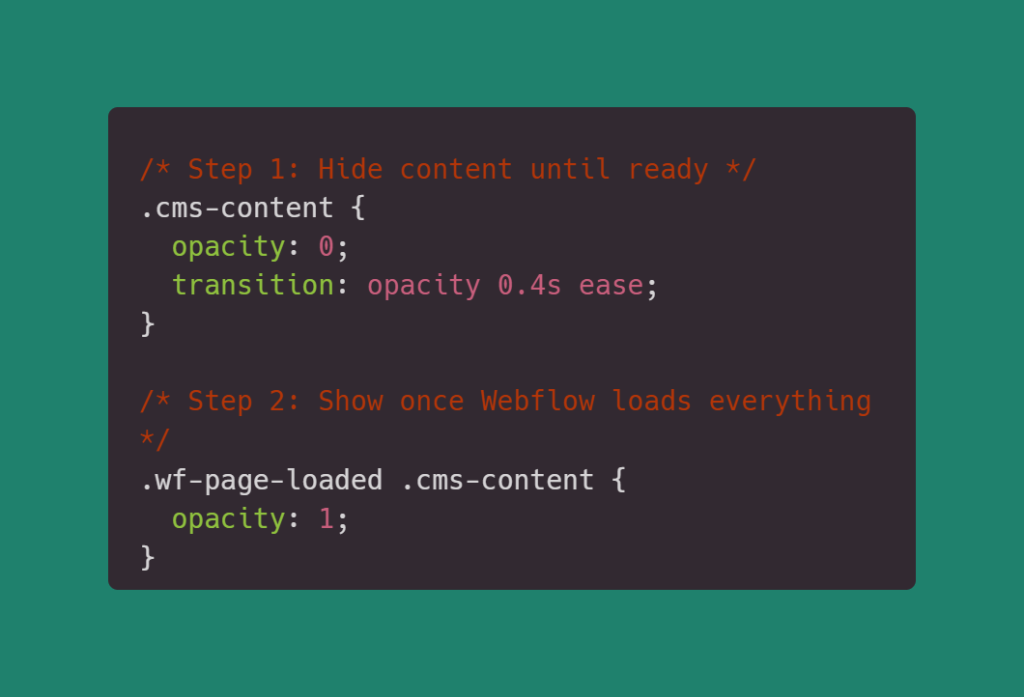
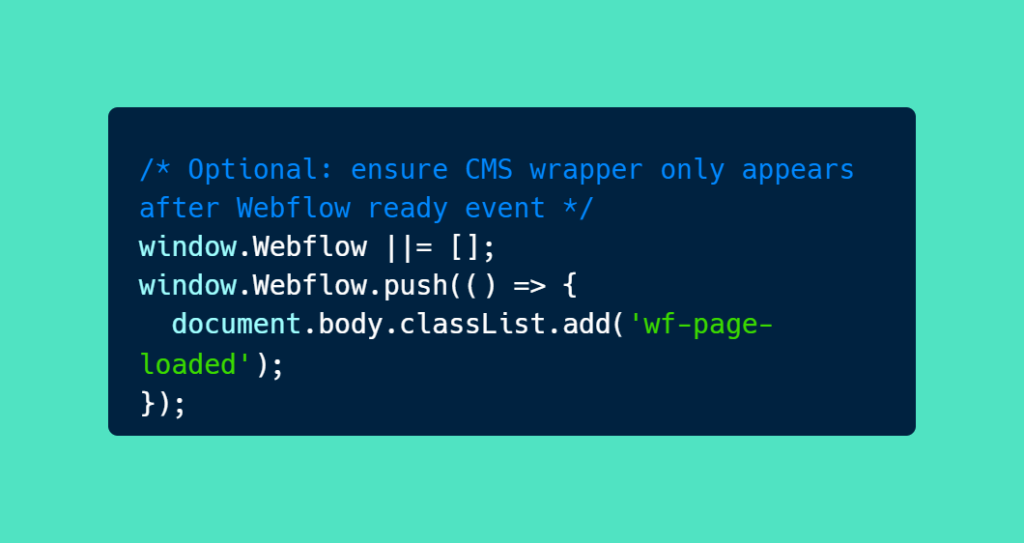
Now, the page loads cleanly, the background and layout appear together, and as soon as Webflow is ready, all dynamic sections and accordion animations fade in smoothly.
The road ahead
At Mavlers, we love solving these micro-interaction challenges that make your Webflow site perform and feel premium.
Want us to implement a smooth-loading experience for your Webflow project? Let’s talk — we’re just one email away.
On that note, we recommend reading ~ When Webflow met Foxy: The power of integrating custom checkout with Webflow’s e-commerce capabilities.