Segmentation sits at the heart of how campaigns come to life in Marketing Cloud Next. It’s what helps you move beyond broad messaging and speak to the right people in a meaningful way. Whether you’re grouping customers by who they are, how they behave, what they’ve purchased, or what they’re doing right now, a solid grasp of segmentation ensures your campaigns land with the right audience at exactly the right moment.
In this guide, our Salesforce Marketing Cloud experts walk you through how to create, configure, and publish segments. Let’s get started.
How to create a segment in Marketing Cloud Next?
Creating a segment
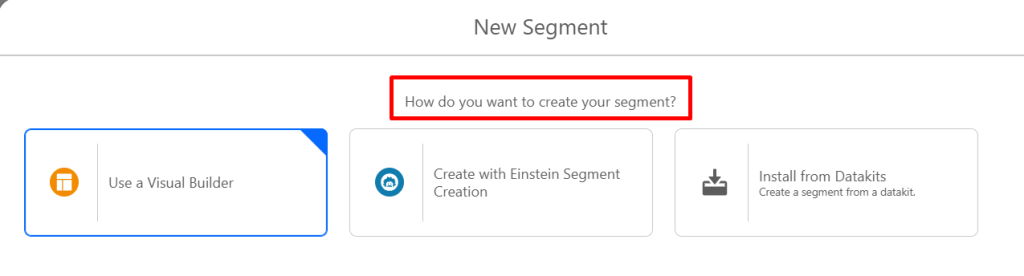
To start with, navigate to the Segments section inside the Marketing app and click New. A window will appear asking how you’d like to build your segment.

Choosing your segment creation method
Under “How do you want to create your segment?”, you’ll find three options:
- Visual Builder: A drag-and-drop interface to define your audience using filters and logic. No query writing needed. This is the go-to choice for most use cases.
- Einstein Segment Creation: Describe your audience and it generates the segment logic for you. Useful in terms of speed, but always review generated filters before activating.
- Install from Data Kits: Import pre-built segments from Data Cloud. It’s used in advanced setups or when deploying standardized configurations across environments.
Einstein Segment Creation is particularly powerful for rapid, insight-driven segmentation.
In a live demo using Pacer Sports data, a plain-English prompt instantly narrowed a pool of 5.2 million people down to 487,000 high-potential targets, ready for a tailored campaign.
For most marketers and everyday campaign needs, the Visual Builder is the obvious choice.
Choosing the type of segment
Next, you’ll decide the behavior of the segment. not the filters themselves. There are four types of segments you can create in Marketing Cloud Next.
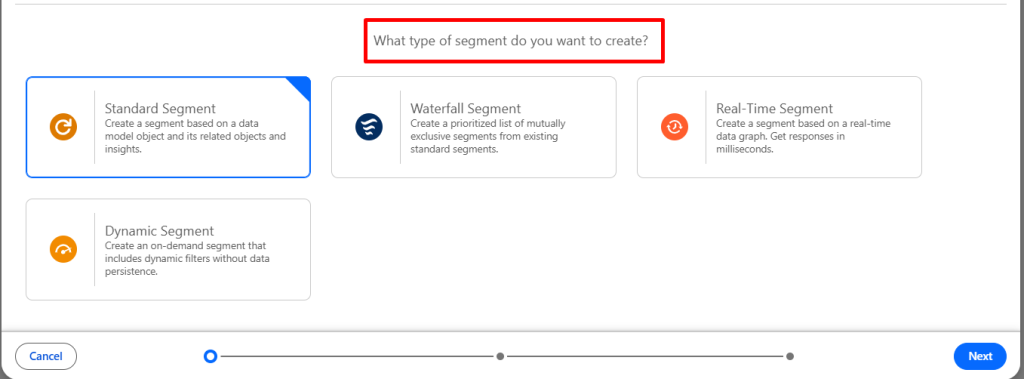
1. Standard segment
This is the most frequently used type. You choose a Data Model Object (e.g. Unified Individual), select related objects if needed, and apply rules based on attributes. Examples:
- Country = India
- Purchased Product A
- Status = Active
If you’re building audience lists for campaigns, this is the option you’ll use most of the time.
2. Waterfall segment
Instead of a single audience, a Waterfall Segment is made up of multiple ordered sub-segments, each with a priority level. An individual can belong to only one sub-segment, which would be the highest-priority one they qualify for. For example:
- Priority 1 — High Value Customers
- Priority 2 — Medium Value Customers
- Priority 3 — Low Value Customers
If someone qualifies for both Priority 1 and 2, they’ll only appear in Priority 1. This is the right choice when you need mutually exclusive targeting. Keep in mind that waterfall segments can take a while to refresh, so you must be patient.
3. Real-time segment
Designed for advanced use cases, Real-Time Segments work with Real-Time Data Graphs and update instantly based on incoming data. They’re typically used in triggered campaign flows and real-time personalization scenarios where immediate data updates matter.
4. Dynamic segment
Dynamic Segments combine static filters with time-based logic.
The system re-checks certain conditions just before the message is sent, so your audience reflects the most current data at send time. For example:
- Subscription status is Active at time of send
- A specific field was updated before email execution
For most campaign executions, the Standard Segment will be sufficient. The other types are powerful but are designed for specific scenarios involving priority logic, real-time updates, or time-sensitive data checks.
“I’m not interested in what you did in the past. I’m interested in what I think you will do in the future. If you bought a Sophie Cunningham jersey in the last 30 days, you are pretty darn likely to go to an Eric Church concert. That’s not a segment teams would traditionally have built — but that’s the type of dynamic segment we’re looking for.”
— Joey Graziano, Chief Commercial Officer, Pacer Sports and Entertainment
Configuring segment properties
Once you’ve selected your type, configure the basic settings. For this walkthrough, we’re using Marketing Cloud Next’s Visual Builder with a Standard Segment configured as follows:
- Data space: We are using the Default Data Space. If your organization operates multiple brands or environments, you may see additional Data Spaces.
- Segment name: Test segment
- Segment On: We are selecting a Unified Individual. The Unified Individual represents the consolidated profile after identity resolution, so even if data comes from multiple sources, it’s tied back to a single person.
- Description: We’ll add a short description, This is a test segment.
You must select Unified Individual in the “Segment On” field. If you choose any other object, the segment will not appear as an option when setting up your flows or campaigns.
If your segment isn’t showing up downstream, this is the first thing to check.
Publish type
Decide how the segment should refresh and how far back it should look at engagement data. In Marketing Cloud Next, you’ll find two types:
- Standard Publish: Looks back up to 2 years of engagement data. Can be activated across email journeys and advertising platforms. Ideal for most marketing use cases.
- Rapid Publish: Focuses on recent activity only. Looks back just 7 days but refreshes more frequently. Best when you need near real-time responsiveness based on very recent actions.
The importance of publish type becomes clear when you consider the kind of dynamic communication strategies teams are building. The Pacers evolved their “welcome to the family” message from a single generic email to 10 separate versions, each triggered by signals like the fan’s zip code, whether children are in the household, or whether they appear to be visiting for a convention. That kind of recency-sensitive logic depends on data that is fresh, making Rapid Publish the right choice for time-critical triggers.
Publish schedule
Choose how often the segment refreshes: Hourly, Daily, Weekly, or Monthly.
For regular campaign usage, a daily refresh is usually sufficient.
Lookback window
Defines how far back the system retrieves data when evaluating conditions e.g. last 30 days, last 6 months, or last 1 year. This becomes important when working with engagement-based filters.
Building the segment logic

Now for the most important part: defining who qualifies. Once inside the Visual Builder, you’ll see a filtering interface with two panels on the left:
- Direct attributes: These belong directly to the Unified Individual profile e.g. name, gender, birthdate.
- Related attributes: These come from objects connected to Unified Individual e.g. email details, addresses, transactions.
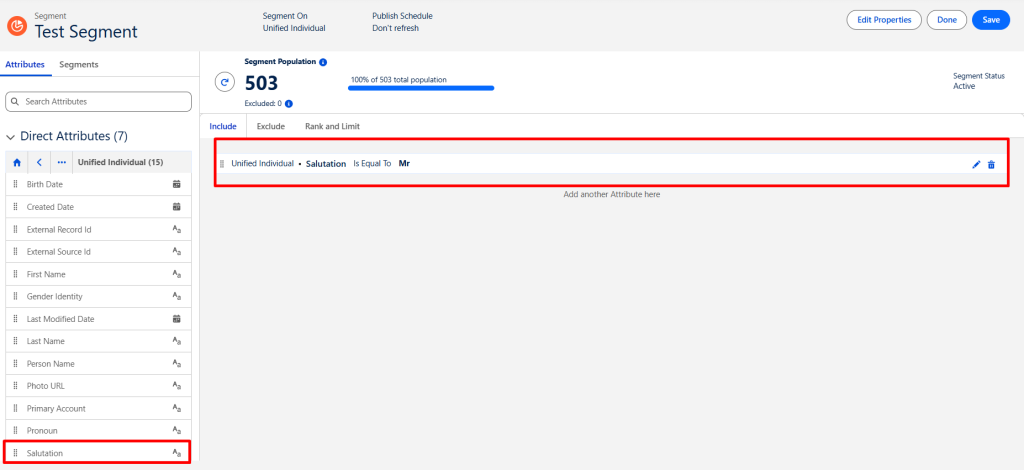
Here’s how to build a simple segment targeting individuals with the salutation “Mr”:
- Open the Direct Attributes menu and find the Salutation field.
- Drag the Salutation attribute onto the blank section of the segment canvas.
- Set the operator to “is equal to” and enter Mr as the value, then click Done.
- Click Save to restart the segment count and confirm your configuration.
Making the segment live

After validating your audience and reviewing the count, publish the segment. Publishing activates it and allows it to refresh automatically based on the schedule you configured.

Getting started with segmentation in Marketing Cloud Next
Segmentation in Marketing Cloud Next goes beyond simple filtering. With options like Standard, Waterfall, Real-Time, and Dynamic segments, marketers can tailor audience logic to match business priorities, responsiveness requirements, and campaign objectives.
By understanding how segment types, publish methods, refresh schedules, and lookback windows work together, you can design audiences that are both accurate and scalable.