
Modern websites can no longer afford to stay static assets. They need to evolve constantly — campaigns change, features roll out, and content expires. Over time, audiences’ needs and your company’s offerings to meet those needs will evolve, too.
Having a static website means you can’t do all this.
Static websites, where every user sees the same content, show the same HTML file to every single visitor. The content is a part of the page design and won’t change unless you edit the original HTML at a code level.
Because you serve the same file to all visitors, adding personalization to your static websites is never easy. And which makes it difficult to meet the need for buyer’s journey optimization on an ongoing basis.
In this context, dynamic websites are extremely open to personalization. These types of websites let you adjust the content to individual visitors. Each user sees web content based on their preferences.
To be able to do this, the website needs to show or hide dynamic elements based on specific criteria. That’s called conditional visibility.
Webflow’s latest upgrade to Conditional Visibility is a great example of such prime dynamism in web development.
Webflow conditional visibility marks a meaningful shift in how websites can be built and managed at scale, on the fly. Aside from UI improvement and delivering Webflow personalization, it fundamentally changes how logic, reuse, and flexibility work across components and CMS-driven content.
Let’s break down how Webflow conditional visibility works and how to set it up for scalable websites.
What is conditional visibility in Webflow?
Webflow conditional visibility is a versatile feature available for web development. With conditional visibility, you can set up the visibility logic and control when and where content appears based on this logic.
Conditional visibility in Webflow saves your team hours of manual duplication of sections and workarounds. Teams can reuse the same page for different users by adjusting content as per variables and showing tailored content automatically.
From a user perspective, Webflow conditional visibility is the most efficient method to display tailored content that is most relevant for users’ context or rules. Whatever the conditions, being able to personalize what visitors see and interact with creates an engaging and intuitive website experience.
At the heart of it lies Webflow conditional logic that determines if certain website elements should be visible or hidden.
Webflow conditional rendering is based on specific conditions or criteria that you set. By setting specific conditional rules, you call the shots on what content appears and for whom. For example, if the user clicks on “Yes”, show additional option fields. Conversely, if the user response is “No”, conceal the additional fields or display a default field.
Of course, the visibility criteria for Webflow can use more complex flows than this. Such as multiple conditions (using AND/OR), and conditional values with If/Then/Else logic.
The Webflow conditional visibility conditions can be user actions, data inputs, or other contextual factors. Using conditional visibility, you can adapt your website to various user interactions and contexts.
With the latest update, rules for conditional content delivery in Webflow rules now work at a system level. To be specific, inside components.
This means components can intelligently adapt based on:
- CMS field values
- Component properties
- Variants
- Date-based conditions
The components become more flexible, need less duplication, and render as per logic-driven conditions as opposed to relying on CSS or repeated HTML.
In simple terms, a single component can be made to behave differently across pages without being rebuilt each time. This transforms the ways websites are designed and built.
Webflow conditional visibility examples
Conditional visibility in Webflow lets elements render only when conditions are met, keeping your code clean by removing bloated HTML on publish.
Here are a couple of examples of how to use conditional visibility in Webflow.
- One of the most powerful uses of Webflow conditional logic is creating a single component to render the correct element. That’s important for better accessibility, avoiding unnecessary markup, and eliminating the risk of using the wrong element. If a “Link” property is set, the site renders a Link Block that notifies screen readers of a destination. If the link field is empty, the site renders a Button Tag instead.
- This is where advanced Webflow CMS logic truly shines. Let’s assume a blog Post template for which your blog editor wants to choose how the “Hero” section looks for each blogpost. In the Webflow CMS, you create a “Layout” dropdown to your CMS collection and connect your Hero sections in that field. If the editor chooses “Columns,” Webflow removes the “Stacked” section from the code for that specific page. The editor has total layout control without the risk of them breaking the site’s underlying architecture.
As a web dev professional working with building CMS-heavy pages in Webflow, you’ve probably faced the flash of white screen issues. Here’s our blog on how to fix it: How to stop Webflow’s flash of white screen (No custom code needed!)
How to configure conditional visibility in Webflow?
With conditional visibility in Webflow, you can define rules and show or hide dynamic content accordingly. You can configure it within components and CMS-connected elements.
You’ll find conditional visibility controls in the Settings panel. It works much like Dynamic List filters. But rather than applying the conditional logic only to Collection Items or CMS pages, you can make it work across individual elements, components, and even site-wide contexts.
You can:
- Attach visibility rules to component props.
- Show or hide sections based on CMS data.
- Schedule content using date logic.
- Control layouts through variants.
How do you define Webflow conditional logic
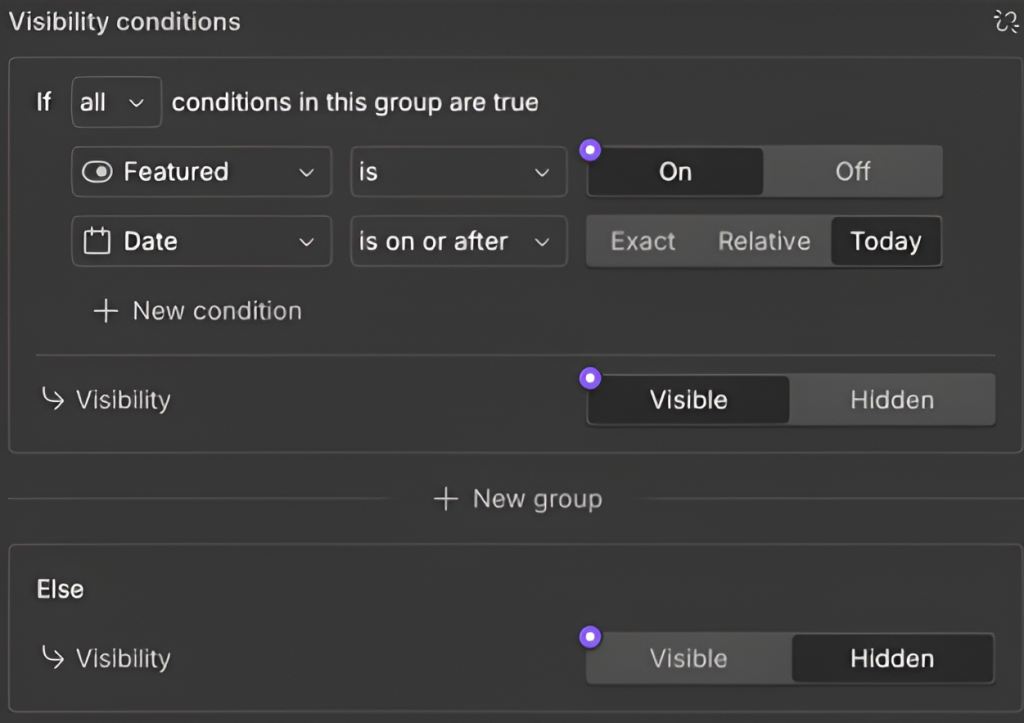
Each conditional rule is made up of three parts:
- A data source: This is where the data comes from. It could be a CMS field, a component property, or a locale value.
- A rule: How to check it, based on data type:
- Text fields: Contains, starts with, ends with a value.
- Switch fields: Is on or off.
- Single reference: Matches fields from the linked collection.
- Multi-reference: Contains any, is set, or empty.
3. An expected value: This defines what needs to be true for the condition to pass. (e.g., “on,” “USA,” or a specific word).
What happens when a condition is met (or not)
After the condition is fixed, you decide the outcome. You can be more granular than simply hiding elements visually. Webflow lets you control whether an element is:
- When true: Rendered or removed
- When false: Switched on or off
This means that, when a condition is satisfied, the element isn’t just hidden, it can be removed from the published site. This keeps the output clean and intentional.
Inside components, these outcomes can also be tied to switch properties. Hence, the same logic can work consistently wherever the component is used.
How to use multiple conditions
It’s common for more advanced Webflow CMS logic to demand more than one condition. Webflow offers this functionality and lets you combine rules in condition groups for complex needs:
Each group:
- Add rules inside a group.
- Choose “all must be true” or “any one true.”
- Each group sets its own output (visible/off, etc.).
How to create a conditional
To create conditional visibility in Webflow, you have to use Conditionals, which can be created in two places:
- On an element’s visibility setting
- On a component switch prop
On an element’s visibility setting
This is a basic setting on any element (like a div, image, or button).
- If the element is inside a component, double-click the component to edit it.
- Select the element you want to show or hide.
- Go to Element settings → Visibility.
- Click the plus (+) icon.
- Click Create conditional.
On a component switch prop
This is a reusable toggle inside Components (Webflow’s reusable blocks like buttons or heroes).
- Select the component instance.
- Click the plus (+) icon next to the switch prop in the right panel.
- Click Create conditional.

Why Webflow conditional visibility is crucial for scalable websites
Before this update, many teams had to rely on duplicate components, custom scripts, or developer intervention for even small changes. This is a major step toward building systems, not just individual pages
Now, Webflow sites become easier to maintain and grow because:
- Marketing teams can manage visibility without developer dependency.
- Content updates happen faster and more safely.
- Duplicate sections are eliminated.
- Site architecture stays clean over time.
- Long-living projects remain manageable as they scale.
Webflow conditional visibility: Practical use cases
Here are a few real-world scenarios where conditional visibility in Webflow delivers immediate value:
1. Time-based campaigns
Automatically show or hide banners, announcements, or promotions based on start and end dates — without manual intervention.
2. Feature launch indicators
Display “New” or “Beta” labels for features launched within a specific timeframe using CMS date fields.
3. Audience-specific CTAs
Show different calls-to-action based on CMS attributes, page context, or component variants.
4. Content expiry
Auto-hide outdated offers, events, or notices once they’re no longer relevant.
5. Scalable Design Systems
Reuse the same component across marketing pages, landing pages, and CMS templates while allowing each instance to behave differently.
The bigger picture
A website should not require a developer for every small adjustment.
This update allows teams to:
- Move faster
- Test ideas without friction
- Reduce operational cost
- Keep websites adaptable as businesses evolve
Final thoughts
Conditional visibility in Webflow has evolved into a foundation-level feature — one that supports scalability, flexibility, and long-term maintainability.
If you’re planning to build or redesign a website, this is the kind of capability that determines whether your site will age gracefully or become harder to manage over time.