Customer experience exists on a continuum, not in isolated compartments. From the customer’s perspective, your brand is the sum of brand impressions—expectations set, memories formed, stories told, and relationships built—that together influence the decision to choose your product or service over another.
That’s why, although channel-first marketing may make sense, it’s not effective any more.
Fortunately, platforms like Braze are designed to make cross-channel marketing a practical reality for businesses across industries. As Braze Alloy partners, we’ve got the knowhow, too.
So, let’s find out how you can plan and run a successful cross-channel campaign in Braze.
Braze cross-channel engagement: The steps
1. Define your cross-channel strategy
Strategy is the first thing you need to get right before you touch Braze. If you already have this locked in, feel free to move on to the next section. If not, stick around.
Your cross-channel strategy will largely be shaped by the industry you operate in. That said, there are a few principles that apply across the board. Here’s what you should keep in mind:
- Map every tactic across owned, paid, and earned channels to survey the full ecosystem and avoid siloed execution from the first.
- Anchor the strategy in Owned channels (email, SMS, social, website) because these are long-term assets. Use Paid and Earned to drive people into Owned environments.
- Design channels to work as a flywheel, not one-offs. So Paid drives Owned, Owned nurtures conversions, and Earned amplifies your credibility.
- Prioritize tactics based on business model, budget, and customer intent. With so much information everywhere, it has never been easier to strategize around trends.
Once the strategic foundation is clear, you’re ready to put it into action in Braze.
Note that data mapping is the foundational bridge between strategy and technical execution. By aligning your business goals with specific data requirements in parallel with strategy development, you ensure that the attributes and events needed are actually available in Braze.
2. Define your audience
After setting up your entry logic and controls, define who should enter your Canvas by selecting segments and applying filters.
Start by choosing pre-built segments from your workspace. For a welcome series, you might select an “Onboarding” segment that identifies users who haven’t made a purchase yet. You can combine multiple segments to create precise targeting.
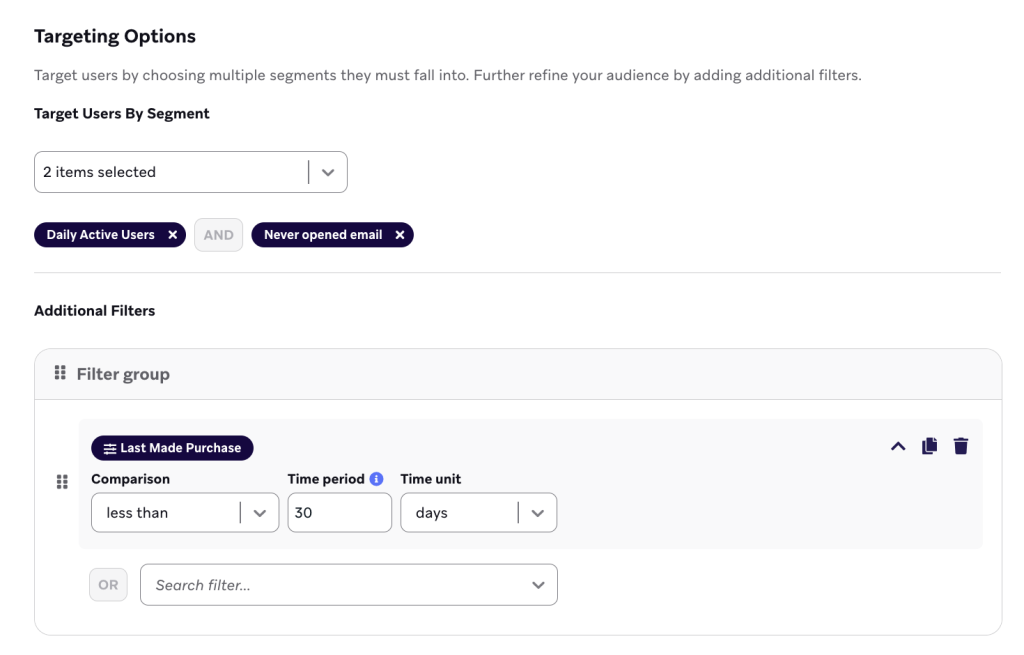
Source: Braze
Add additional filters
Layer on additional filters to refine your audience further. Braze offers several filter categories:
- Custom attributes and events: Any custom data you’ve integrated into Braze specific to your business.
- Out-of-the-box filters: First use of app, last purchase date, money spent, Intelligent Channel preferences, and more.
- Retargeting filters: Target users based on their interactions with previous campaigns.
So, you might target users who have added an email address (the entry trigger) AND have not made a purchase (segment filter) AND last used the app within 30 days (additional filter).
3. Set the entry criteria for users
Next, define how users enter the Canvas. There are two ways:
- Action-based triggers
- Segment entry
Choose an action-based trigger that reflects a meaningful user milestone. In Braze, triggers are most effective when they map cleanly to intent or lifecycle progression.
With that in mind, we suggest you prioritize high-signal triggers such as:
- Perform Custom Event (most flexible and most used)
- Make Purchase (any vs. specific product)
- Change Custom Attribute Value (great alternative to logging new events)
- Add an Email Address (clean proxy for account creation)
Important: Avoid redundant triggers where possible. In addition, if a user behavior represents a state change, go for attribute-change triggers to reduce data ingestion overhead.
So instead of logging a new event every time, you just update the attribute.
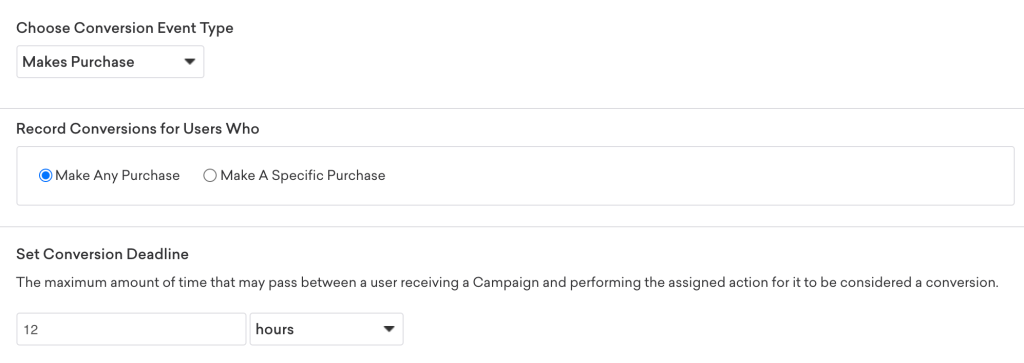
4. Set conversion events
In Braze, a conversion event is a success metric to track whether or not a customer or subscriber performs a high-value action within the expected time.
Source: Braze
So you need to set a conversion event before proceeding. A few things:
- Set your most critical conversion goal as the primary event, followed by secondary goals. (Preferably, Custom events > Start Session > Email engagement metrics)
- Don’t feel obligated to use all four conversion slots. Choosing 2-3 is common.
- For Start Session events, you can specify which platform to track, whether it’s your app, or your website, or all the platforms.
- It is best to avoid Opens and Clicks since both tend to be inflated artificially.
Important: Set a conversion deadline that aligns with your journey duration to ensure attribution is tracked throughout the entire journey.
Please note that conversion events must be assigned before you launch a campaign. If you need to modify conversion events post-launch, you must duplicate and relaunch the campaign.
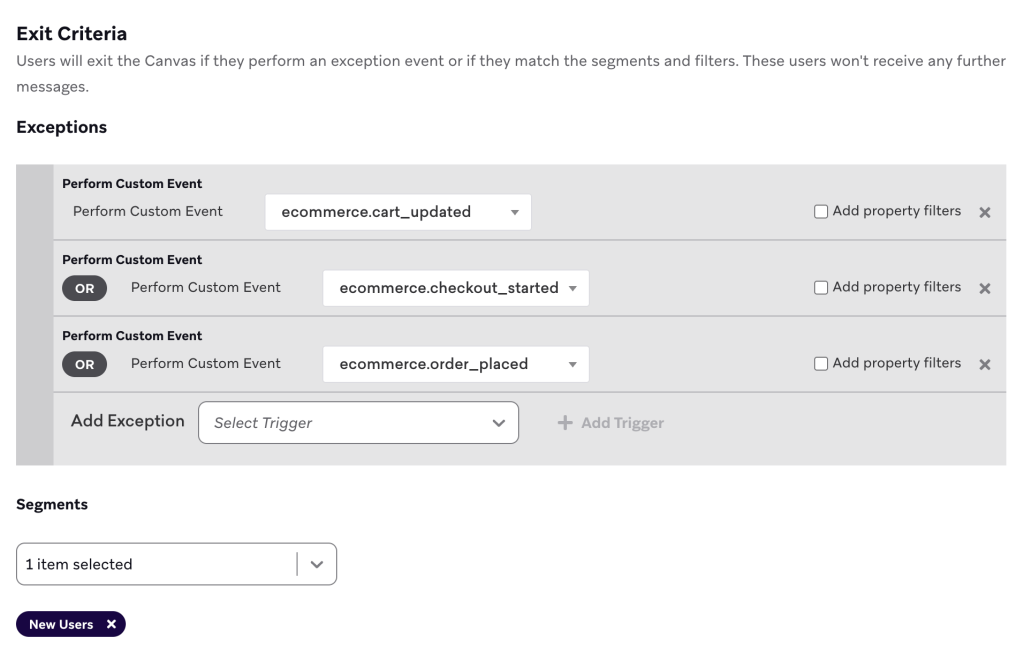
5. Set exit criteria
Once entry logic is defined, determine when users should stop progressing through the journey.
For greater control, we recommend using exit criteria instead of exception events. Exit criteria let you precisely define when a user should leave the canvas based on changing conditions. For example, you can automatically exit a user when a context variable reaches a specific value.
Source: Braze
Exit criteria can also handle exception-like logic. Consider this scenario:
- A user enters a canvas when they start a subscription, with the subscription ID stored as a context variable.
- If the user cancels that specific subscription, they should exit the canvas.
- The exit criteria would evaluate whether the subscription ID in the cancel subscription event matches the subscription ID stored in the context variable.
This approach is especially effective when users can have multiple subscriptions and may enter the same canvas multiple times. It ensures users exit only for the subscription instance.
6. Create the Canvas and build your journey flow
Assuming your Braze instance is already set up, take the following steps:
- Go to Canvas → Canvas Flows.
- Click Create Canvas.
- Name the journey. Optionally, Add Description. Then, add Tags.
While Description is optional, we recommend adding it for easier reference later.
Before moving on to the next step, assign the new Canvas to a team. Braze allows you to create multiple teams and associate specific users with each one, ensuring that only relevant stakeholders have access to the canvases they need. This not only streamlines collaboration but prevents accidental edits from too many hands in the workflow.
Now, let’s build out the journey flow. We’ll consider a simple welcome flow built across 12 days. Take a look at the following table which captures the cross-channel journey.
| Cross-channel Welcome Flow in Braze | |||||
|---|---|---|---|---|---|
| Day | Journey Step | Canvas Component | Channel | Target Audience | Purpose |
| 0 | Welcome email | Message step | All new sign-ups entering Canvas | To introduce your brand and offer a sign-up incentive | |
| 1 | Wait | Delay | — | — | To prevent overmessaging |
| 2 | Push introduction | Message step | Web Push/App Push | Push-enabled users | To encourage ongoing engagement and expectations |
| 5 | Wait | Delay | — | — | To space out communications |
| 5 | Audience split | Audience Path | — | All active users | To branch users based on purchase behavior |
| 5 | Post-purchase engagement | Message step | Push | Users with ≥1 purchase | To reinforce purchase, prompt social sharing |
| 5 | Coupon reminder | Message step | Push | Users with 0 purchases | To nudge conversion with unused incentive |
| 8 | Wait + merge paths | Delay | — | All users | To reunite users before next touchpoint |
| 8 | Incentive reminder | Message step | In-App message | All users | To maintain momentum with a free-shipping offer |
| 12 | Wait | Delay | — | — | To create a final urgency window |
| 12 | Final audience split | Audience Path | — | Users with 0 purchases | To identify non-converters |
| 12 | Last-chance conversion | Message step | SMS | Users with 0 purchases | To drive the final conversion with a better incentive |
Please note that the above journey is representative only. The journey flow will vary by industry, subscriber behavior, time, and other factors.
7. Configure send settings
Before building out the journey flow, configure the send settings to maintain control over how and when messages are delivered:
- Subscription status: Choose whether messages should be sent only to subscribed or opted-in users, or to all users. (Pick the last one for transactional messages.)
- Rate limiting: Control the speed at which messages are sent to avoid overwhelming your email infrastructure or customer support teams.
- Frequency capping: Use this to limit the number of messages a user can receive within a given period to reduce the risk of message fatigue.
- Quiet hours: Define time windows during which messages should not be sent. Messages scheduled during these periods can either be delayed until the next available time or held until the next user session.
8. Personalize and optimize
We won’t dive into the mechanics of personalization, as that’s beyond the scope of this guide. For now, keep the following points in mind:
- Use Liquid to create “if/else” logic within a single message.
- Leverage Braze’s AI tools such as Intelligent Timing and Intelligent Channel. Intelligent Timing delivers the message when the individual user is most likely to engage. If a user never opens emails but always clicks Push notifications, Braze can automatically prioritize the Push channel for that specific user. That’s Intelligent Channel.
- Harness Connected Content. It allows you to pull in real-time data from your own external APIs at the moment of send.
Importantly, personalize based on what the users haven’t done yet, not just what they have done. Use audience paths and action-based logic to shift messaging toward the next best action.
9. Testing and QA
Testing and QA-ing is the most critical step. Consider the following checklist:
- Use the “Preview Message” tool to see how your Liquid logic renders for actual users in your database. Use the “Lookup User” feature to input a specific User ID and see if they would currently qualify for the entry criteria or be caught by a filter.
- If you have an Audience Split, manually check the logic.
- Click every link in every channel. Ensure that UTM parameters are correctly appended so your web analytics can attribute the traffic back to the specific Canvas step.
- If your Canvas is Action-Based, perform the action yourself using a test account. Check if the “Wait” steps and “Quiet Hours” correctly hold the message or if it fires immediately.
- Simulate the event that should exit a user out of the journey. Verify that the user is actually removed from the Canvas and doesn’t receive the next “nudge” message.
Explicitly test attribute-based triggers by validating all three real-world scenarios: creating a new user with the attribute already set, updating the attribute value for an existing user, and adding the attribute for the first time to an existing profile. This ensures your Canvas behaves predictably and correctly across all lifecycle states.
10. Launch the Canvas
For complex journeys with multiple steps, manage visibility by switching between Detailed View and Simplified View. Simplified View condenses the Canvas into a cleaner layout, making it easier to follow the overall flow and identify optimization opportunities in multi-step campaigns.
Save your Canvas as a draft. Once everything is validated, launch the Canvas.
Take lifecycle orchestration in Braze further with Mavlers
Once your Canvas is live, the work doesn’t stop. Monitoring performance is the final step. But you now have a complete guide to cross-channel marketing in Braze.
If you need help bringing these campaigns to life, we can help. We have successfully managed over 2,000 campaigns and automations on the platform.
Book a no-obligation call with one of our Braze experts for implementation support.